Gather pine cones from your backyard and transform them into glittering masterpieces by brushing on mod podge and rolling them in silver or gold glitter, then attach a ribbon loop for instant rustic charm. Slice oranges thinly, bake them at 200°F for three hours until completely dried, and thread twine through the top to create naturally fragrant citrus ornaments that fill your tree with the scent of the season. Pour clear resin into silicone molds, add dried flowers, miniature bells, or family photos, and let cure for 24 hours to craft crystal-clear keepsakes that capture your most treasured holiday moments. Cut felt into simple shapes like stars, stockings, or mittens, hand-stitch around the edges with embroidery floss in contrasting colors, and stuff lightly with cotton batting for soft, child-safe decorations perfect for little hands.
The magic of making ornaments together lies not in achieving perfection, but in the flour-dusted giggles, the paint-splattered fingers, and the proud moment when your child hangs their very own creation on the tree. These handcrafted treasures become time capsules of childhood wonder, each slightly crooked star and glue-smudged bell telling the story of cozy December afternoons spent crafting memories that will sparkle in your hearts long after the season ends. Whether you choose natural materials that bring the forest indoors or modern resin techniques that preserve precious mementos forever, homemade ornaments transform your tree into a living storybook of your family’s unique traditions and shared joy.
Why Resin Ornaments Capture Christmas Magic Like Nothing Else
There’s something almost otherworldly about holding a resin ornament up to the light for the first time. As the glow catches each suspended glitter flake, each carefully positioned pinecone fragment, or that tiny sprig of evergreen from your backyard, you realize you’ve captured something more than just craft materials. You’ve frozen a moment in time, preserved it in crystal-clear perfection, and created something that will catch the tree lights for decades to come.
Unlike paper ornaments that fade or ceramic pieces that lose their luster, resin has this remarkable glass-like clarity that seems to magnify the beauty within. Remember that morning walk when you found the perfect red berry branch dusted with snow? Or the pressed flowers from your grandmother’s Christmas garden? Resin lets you tuck these precious fragments right inside your ornament, protecting them like treasures in a snow globe. Years from now, your children will hold that same ornament and see exactly what you saw, perfectly preserved in time.
The magic deepens when you realize these aren’t just decorations you’re making. They’re future heirlooms. Each ornament becomes a tangible memory, a keeper of stories. Maybe you’ll embed a photo from baby’s first Christmas, or sprinkle in sand from a holiday beach trip, or seal in confetti from a memorable celebration. These aren’t the generic ornaments you’ll pack away without a second thought. These are the ones your grandchildren will unwrap with gentle hands, asking, “Tell me the story behind this one again.”
That’s the true enchantment of resin ornaments. They transform simple craft time into memory-making, turning ordinary materials into extraordinary keepsakes that sparkle with both light and love.
Gathering Your Ornament-Making Treasures
Essential Resin Supplies
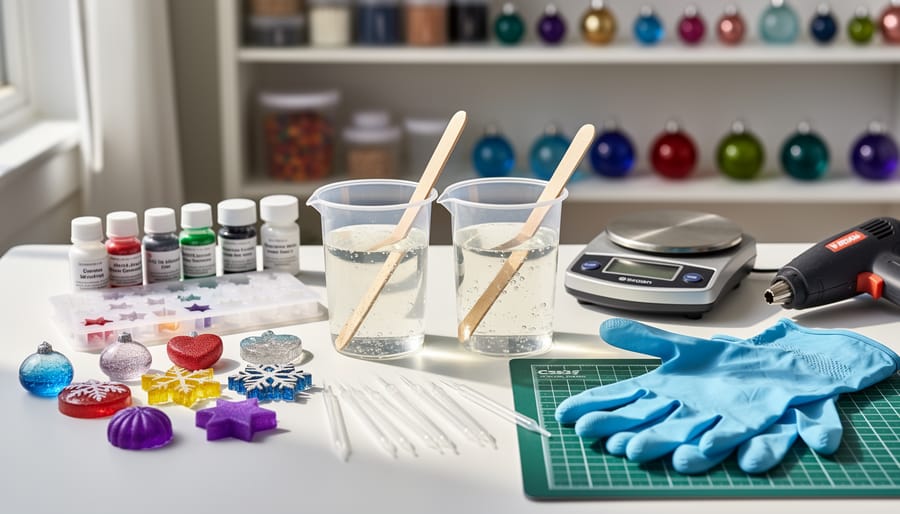
Before you begin your enchanting journey into resin ornament crafting, gathering the right supplies will set you up for magical success. Think of these materials as your festive toolkit for creating treasures that will sparkle on your tree for years to come.
At the heart of your project lies two-part epoxy resin, a crystal-clear substance that transforms from liquid to glass-like beauty. This magical mixture consists of resin and hardener that, when combined, create stunning ornaments with a professional finish. Don’t worry if this sounds scientific – it’s wonderfully forgiving for beginners and creates results that look like they came straight from Santa’s workshop.
Silicone molds shaped like classic ornament forms are your next essential. These flexible helpers come in delightful varieties – from traditional baubles to snowflakes and stars. Their non-stick surface means your finished creations will pop out easily, ready to catch the light of twinkling tree lights.
You’ll need sturdy mixing cups and stir sticks to blend your resin properly. Clear cups let you see exactly what you’re creating, while disposable sticks make cleanup a breeze. This is particularly helpful when little helpers are involved in the crafting fun.
Finally, protective gloves keep your hands safe and clean throughout the process. While resin is beginner-friendly, gloves ensure a worry-free experience, letting you focus on the joy of creation rather than messy fingers. With these supplies gathered, you’re ready to craft ornaments filled with memories and holiday magic.
The Sparkle and Wonder Additions
This is where the magic truly happens, where your ornament transforms from lovely to absolutely enchanting. Picture opening a treasure chest filled with possibilities: shimmering glitter that catches the light like fresh snow on Christmas morning, delicate dried flowers pressed between the pages of grandmother’s recipe book, or tiny pine cones gathered during an autumn walk. Mica powder adds an ethereal, frosted quality reminiscent of winter windowpanes, while metallic leaf brings touches of gold and silver worthy of a Victorian Christmas tree.
Consider nestling miniature ornaments within your resin creations, creating whimsical scenes frozen in time. Ribbons in rich burgundy, forest green, or cream can add a classic finishing touch, while small eye hooks make hanging your treasures effortless. The beauty of these embellishments lies not in following rules, but in following your heart. Perhaps your family tradition calls for incorporating red berries, or maybe your little one insists on adding extra sparkle. These personal touches transform simple ornaments into storytellers, each one whispering its own tale of the hands that crafted it and the love poured into every detail.
Your Workspace Preparation
Before the magic begins, let’s set the stage for your creative adventure! Choose a workspace where spills and sparkles are welcome—perhaps that sturdy kitchen table covered with a cheerful plastic tablecloth or layers of newspaper. Remember those childhood art projects when your grandmother spread out old bedsheets to protect the floor? That same loving preparation makes all the difference now.
Gather your supplies within arm’s reach, arranging them like treasures waiting to be discovered. Small cups for mixing, molds lined up like little soldiers, and all your festive embellishments sorted into containers create an organized wonderland. If you’re working with resin, crack open a window to invite in fresh air, keeping your crafting space as crisp as a winter morning. Good ventilation isn’t just practical—it keeps your holiday spirit bright and energized throughout your creating session. This thoughtful preparation transforms ordinary crafting into an experience where memories bloom alongside ornaments, ensuring every moment feels as special as the finished treasures you’ll soon hang upon your tree.
Crafting Your First Resin Ornament: A Step-by-Step Journey
Mixing Your Resin (The Foundation of Magic)
Think of mixing resin like making hot cocoa on a snowy evening – precision matters, but there’s nothing to fear. Most resin kits use a simple 1:1 ratio, meaning equal parts resin and hardener. Pour your resin into a measuring cup first, then add the hardener in a separate container. This isn’t the moment to eyeball it, dear crafter. Accuracy ensures your ornaments cure into glossy treasures rather than sticky disappointments.
When combining the two, stir slowly and deliberately for at least three minutes. Imagine you’re folding memories into the mixture – gentle, thoughtful movements that blend everything thoroughly. You’ll notice tiny bubbles forming, like champagne celebrating your creativity. That’s perfectly normal. Scrape the sides and bottom of your cup as you mix, ensuring every drop mingles together.
The magic happens in the patience. Mixed resin typically offers a 30-45 minute working window before it begins to set, giving you plenty of time to pour into molds without rushing. The consistency should resemble honey – clear, smooth, and flowing gracefully. If you’re feeling nervous, remember that generations of ornament makers started exactly where you are now, and their trees sparkle brighter for it.
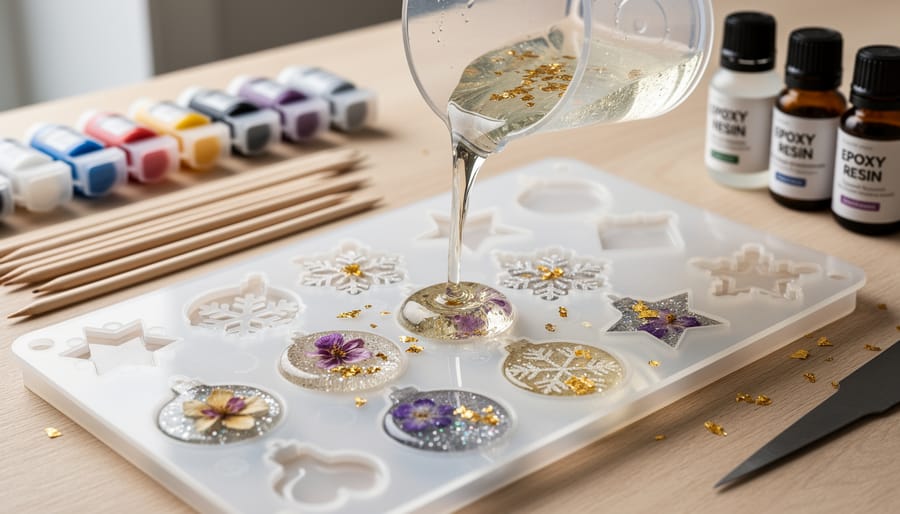
Adding Color and Sparkle
Now comes the magic of transformation, where your ornament truly comes alive with personality and charm. For that timeless Christmas feeling, swirl in rich crimson and forest green pigments, perhaps adding tiny gold flakes that catch the light like stars on a winter’s night. These classic colors evoke memories of candlelit trees and crackling fireplaces, connecting your creation to generations of holiday traditions.
If you’re dreaming of a winter wonderland theme, embrace soft whites, icy blues, and shimmering silver glitter. Picture freshly fallen snow glistening under moonlight, and let that imagery guide your hand as you sprinkle iridescent powder into the resin. The effect creates ornaments that dance with ethereal beauty, perfect for those who love the quiet elegance of a frosty December morning.
For sophisticated gold elegance, combine champagne-colored pigments with fine gold leaf fragments. This regal palette brings warmth and luxury to your tree, transforming simple ornaments into heirloom-quality treasures. Remember, a little sparkle goes a long way—start conservatively and add more if needed. The beauty lies in finding that perfect balance where your colors sing together in harmony, creating ornaments that tell your family’s unique holiday story.
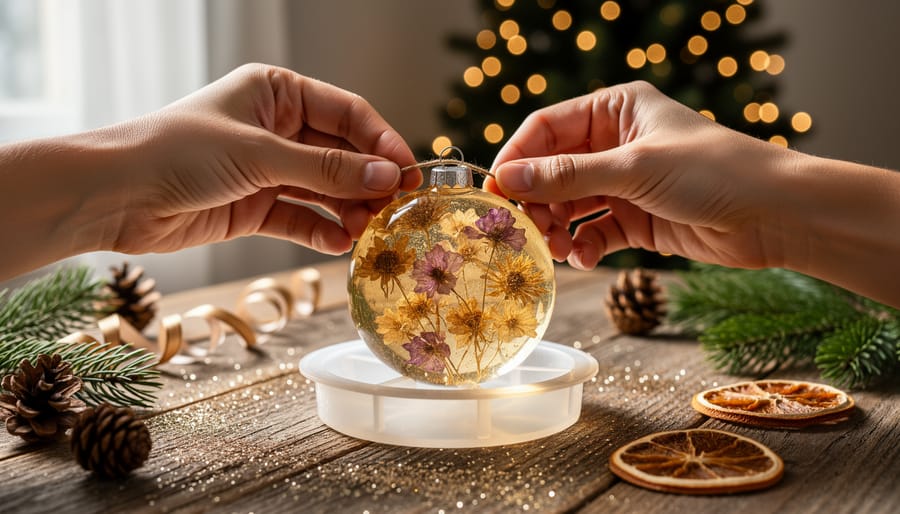
Pouring Your Dreams Into the Mold
Now comes the moment where your vision transforms into something you can hold in your hands. Take a deep breath and steady your pour, tilting the measuring cup slowly as a ribbon of resin flows into your silicone mold. There’s something almost meditative about watching it settle, finding its level like a tiny, crystalline pool. Pour in a continuous stream close to the mold’s surface to minimize those pesky air bubbles that might trap themselves inside.
If you spot bubbles dancing on the surface, gently exhale over them or use a toothpick to coax them to the edge. For those stubborn ones hiding beneath, a quick pass with a heat gun or lighter works wonders, though keep your distance to avoid overheating.
Creating depth through layering adds enchantment to your ornament. Pour a thin base layer first, then nestle in your treasures: tiny pinecones gathered from autumn walks, dried flowers pressed between book pages, glitter that catches the tree lights like fresh snow, or even small photographs sealed in waterproof coating. Let each layer cure slightly tacky before adding the next, building your ornament like a snow globe frozen in time.
Perhaps embed your child’s first letter to Santa, or sprinkle in metallic flakes that swirl like a winter storm captured mid-dance. Each element tells a story, preserved forever in crystal-clear resin. This is where the magic happens, where simple materials become keepsakes that will grace your tree for generations, each one whispering the story of the hands that made it.
The Waiting Game (Curing Time)
Ah, the sweetest part of any crafting journey—the waiting! Once your ornaments are nestled in their molds, the magic truly begins. Most resin ornaments need 24 to 48 hours to fully cure, transforming from liquid wonder into solid treasures. During this time, resist the temptation to peek too often; like cookies in the oven, they need undisturbed time to set properly.
You’ll know your ornaments are ready when they feel completely hard to the touch and pop easily from their molds without any tacky residue. If they still feel slightly flexible or sticky, give them another 12 hours—patience rewards you with perfect results.
This waiting period carries its own enchantment. Children will ask a dozen times, “Are they ready yet?” Share this anticipation together, checking progress as a family ritual. It’s reminiscent of waiting for Christmas morning itself, that delicious build-up before unveiling something wonderful.
Don’t worry if you notice tiny bubbles or if the surface seems cloudy initially—these often disappear as curing completes. Keep your ornaments in a warm, dry spot away from dust, and soon you’ll hold glistening keepsakes that capture this season’s joy forever.
The Big Reveal and Finishing Touches
The moment of truth arrives when you gently coax your ornament from its mold. Press carefully around the edges and watch as your creation emerges like a butterfly from its cocoon. This magical unveiling often draws gasps of delight from young crafters who’ve waited so patiently.
Once released, attach a small eye screw to the top for hanging, twisting it gently into the resin while holding your ornament steady. Thread through a festive ribbon in rich crimson or shimmering gold, or opt for rustic twine for a farmhouse feel. Some families love adding an extra touch of sparkle with a dusting of glitter on the edges or a delicate brushstroke of metallic paint to highlight embedded treasures.
As you hold your finished ornament up to catch the light, there’s pure enchantment in knowing you’ve created something that will grace your tree for years to come. This handmade treasure carries the warmth of your effort and imagination, a beautiful reminder that the most cherished decorations aren’t purchased but lovingly crafted with your own hands.
Enchanting Design Ideas to Make Each Ornament Special
Winter Wonderland Scenes
Transform your ornaments into miniature winter wonderlands that capture the hushed magic of a snowy evening. Creating snow globe effects is simpler than you might imagine—just add a layer of clear resin, then gently sprinkle in white glitter and tiny iridescent snowflakes while it’s still setting. The particles will suspend beautifully, creating that mesmerizing floating effect we all remember from childhood snow globes.
Tuck miniature pine trees into your design, positioning them at different depths to create a forest scene that tells a story. You can find bottle brush trees in craft stores, or fashion your own from green-tinted wire and flocking. Surround them with pristine white glitter for fresh-fallen snow, and watch as light catches each crystal surface.
For an extra touch of enchantment, embed tiny woodland creatures—a deer, a cardinal, even a snowman—among the trees. These winter wonderland ornaments become cherished keepsakes, tiny windows into a peaceful, snow-covered world that brings comfort and joy each holiday season.
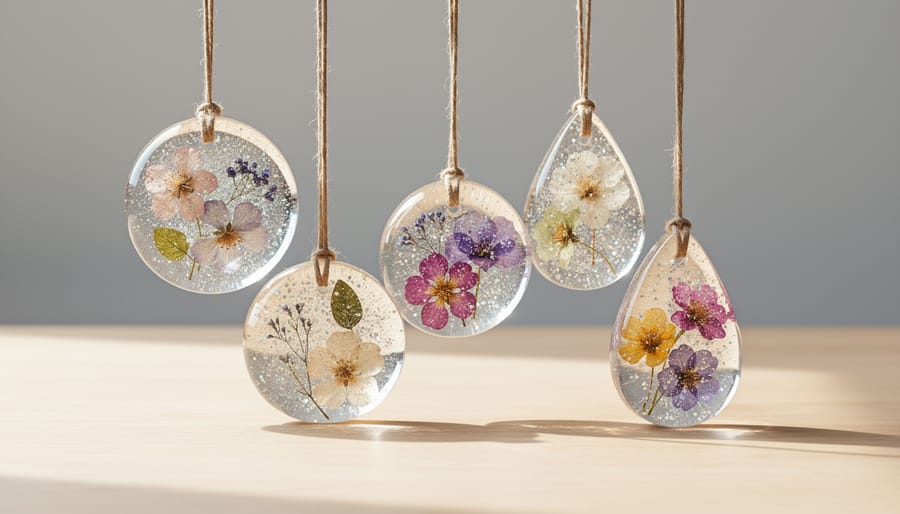
Pressed Flower Memories
Imagine capturing a winter’s walk in a gleaming ornament, each petal and pine needle suspended in time like a snow globe memory. Pressed flower ornaments let you preserve nature’s delicate beauty in crystal-clear resin, creating heirloom pieces that shimmer with the garden’s last blooms and evergreen boughs from your yard.
Gather flowers from your autumn garden before the first frost, or snip sprigs of holly and pine during your tree-trimming adventures. Press them between heavy books for two weeks until paper-thin and completely dry. The same botanicals you might use in DIY holiday wreaths work beautifully here too.
Mix simple two-part resin according to package directions, then carefully arrange your treasures in silicone molds. Watch as the resin transforms humble leaves and petals into jewel-like medallions, catching candlelight with an ethereal glow. Each ornament becomes a botanical time capsule, whispering stories of sunny gardens and snowy woods every time you unwrap it from tissue paper, year after cherished year.
Family Treasure Keepsakes
Transform cherished memories into timeless ornaments that tell your family’s unique story. Tuck a photo from last year’s snow day into a clear glass ball, or frame tiny portraits of loved ones in wooden hoops wrapped with ribbon. Little ones’ artwork becomes gallery-worthy when sealed between two pieces of clear acrylic with festive cord threaded through the top. Those precious first crayon masterpieces suddenly have a permanent place of honor on your tree.
Handwritten recipe cards from Grandma, children’s letters to Santa, or snippets of favorite holiday wrapping paper can be preserved behind resin or decoupage medium for handmade keepsakes that grow more meaningful with each passing year. Press small mementos like concert tickets, pressed flowers from summer gardens, or baby’s hospital bracelet into clay ornaments before baking. These memory-filled treasures become conversation starters, prompting stories that connect generations and keep family history alive through the twinkling glow of the Christmas tree.
Shimmer and Shine Creations
There’s something almost magical about watching light dance across a shimmering ornament, isn’t there? Those twinkling reflections that catch your eye from across the room carry the same wonder we felt as children, mesmerized by the glow of the Christmas tree. Creating these luminous treasures is easier than you might think, and the results are absolutely enchanting.
Gold leaf remains one of the most elegant techniques for achieving that coveted shimmer. Simply brush a thin layer of adhesive onto your ornament surface, let it become tacky, then gently press delicate sheets of gold or silver leaf onto the surface. The slightly imperfect finish creates an heirloom quality that grows more beautiful with each passing year.
For those seeking modern sparkle, aurora pigments mixed into clear resin create an iridescent finish that shifts color as you move around the tree. These pearlescent powders capture light differently than traditional glitter, offering a sophisticated glow reminiscent of winter’s first frost on a windowpane.
And of course, there’s glitter—that childhood favorite that makes everything feel more festive. Layer fine glitters in complementary colors, mixing chunky pieces with ultra-fine dust for depth and dimension that catches every twinkling light on your garland.
Turning Mishaps Into Masterpieces (Troubleshooting Tips)
Every holiday craftsperson encounters a few bumps along their ornament-making journey, and truth be told, these little surprises often become the stories we cherish most. Remember, even Santa’s workshop has its share of wobbly wheels and paintbrush mishaps!
If tiny bubbles have taken up residence in your resin, don’t fret. These sparkly little visitors can actually catch the light beautifully, like snowflakes suspended in time. For future batches, try stirring your resin more slowly and deliberately, letting it rest for a few moments before pouring. A quick pass with a heat gun or even a gentle breath can coax stubborn bubbles to the surface.
Sticky surfaces that refuse to cure properly usually whisper that they need a warmer environment. Resin loves cozy temperatures, much like children gathered around a fireplace. Move your creations to a warmer spot, perhaps near a gentle heat source, and give them extra time to work their magic.
Cloudy or frosted resin often comes from moisture in the air or mixing components that weren’t quite room temperature. Think of it as winter fog settling over your creation. While this can’t always be reversed, embracing the frosted appearance gives your ornament a vintage, snow-kissed quality that looks intentionally magical.
Uneven curing or lopsided ornaments? Simply rotate your pieces every few hours during the curing process, ensuring each side receives equal attention. If one ornament tilts a bit crooked, consider it a reminder that perfection isn’t the goal—connection and creativity are.
The most cherished ornaments aren’t always the flawless ones. They’re the pieces that carry your fingerprints, your laughter, and yes, even your learning moments. These beautiful imperfections become the markers of memories made together.
Making It a Family Tradition
There’s something truly enchanting about opening a box of ornaments each December and discovering the handmade treasures your family created together years ago. Transform your resin ornament crafting into a cherished annual tradition that builds precious memories one sparkling creation at a time.
Start by designating a special weekend each November as your family’s official ornament-making day. Mark it on the calendar with festive stickers, and let the anticipation build as the date approaches. Each year, create ornaments that capture your family’s current chapter—embed tiny photos from the year’s adventures, add handwritten dates and names in metallic ink, or incorporate meaningful elements like sand from a summer vacation or pressed flowers from your garden.
Host a holiday ornament-making party where friends and neighbors join the magic. Set up crafting stations with various molds, glitters, and embellishments, allowing each guest to create their own keepsake to take home. These gatherings become beloved traditions themselves, filled with laughter, hot cocoa, and the gentle chaos of creativity. Consider exploring other kid-friendly crafts to round out your festive celebration.
As your collection grows through the years, you’ll build a treasury of twinkling memories. Each ornament becomes a time capsule, transporting you back to little hands carefully sprinkling glitter, sticky resin mishaps turned into family jokes, and the pure joy of creating something beautiful together. These aren’t just decorations—they’re love made visible, year after year.
As you hang that first handmade ornament on your tree this year, take a moment to appreciate the magic you’ve created with your own two hands. These imperfect, wonderfully unique pieces will become the stars of your collection, the ones your children point to first, the treasures that spark stories and smiles for decades to come. Year after year, as you unwrap each ornament from its careful storage, you’ll remember the laughter that filled the room during crafting sessions, the glitter that somehow ended up everywhere, and the pride in little eyes seeing their creations sparkle under twinkling lights.
There’s no such thing as a perfect ornament, only one made with love. The fingerprints preserved in resin, the slightly crooked ribbon, the enthusiastic application of too much glitter—these become the details that make your tree authentically yours. So gather your materials, invite your loved ones to the table, and begin this beautiful creative journey. You’re not just making decorations; you’re weaving new threads into the tapestry of your family’s holiday traditions, creating heirlooms that will carry the warmth of this season forward into countless Christmases yet to come.