If you recently bought Christmas lights that are too long for your needs and are unsure how to shorten them, we have some information that can help.
Christmas lights typically come in standard sizes. As a result, they can sometimes be too long or too short for whatever purpose you intend to use them. When Christmas lights are too short, you can readily combine two or more strings together using male and female plugs/receptacles. But when they are too long, adjusting the size is not so straightforward. While slightly complicated, shortening Christmas light strands is not impossible.
Determine the Type of Circuit Your Christmas Lights Use
Before you attempt to shorten Christmas lights, you must understand its circuitry. The light bulbs of Christmas lights are either connected in series or parallel.
The type of circuit your Christmas lights use will determine how you shorten them. In other words, how you shorten Christmas lights wired in series differs from how you shorten Christmas lights wired in parallel.
A simple way to determine your string lights’ circuitry is to remove one light bulb from the entire string and see if all the remaining bulbs stay on or go off.
If your light uses a series circuit, removing one bulb will cause a few bulbs or the entire string of Christmas lights go off.
If only a few bulbs go off, then your Christmas light comes as multiple series circuits. But if all the lights on the string go off when you disconnect one bulb, then the whole string is one big series circuit.
If your light uses a parallel circuit, removing one bulb will not affect the remaining bulbs.
How to Shorten String Christmas Lights With Multiple Series Circuits
Since Christmas lights commonly come with multiple series circuits, we will discuss the steps to shorten them first.
Materials Needed:
If you do not have any of these materials already, you can get them at any electrical supply store.
Step 1: Disconnect the Christmas Lights From the Power Outlet
For your safety, ensure there’s no power running through the wires while you are working on the lights.
Step 2: Measure the New String Length You Want
Calculating how many lights your need and figuring out the string length you want will help you determine how many substrings you must remove from the whole string.
Step 3: Determine the Beginning and End of the Substring You Want to Remove
If your Christmas/mini lights come with multiple series circuits, the safest option for shortening it is to remove one of the substrings.
To remove a substring, you must first determine where it starts and where it ends. Once you figure this out, move to the next step.
A simple way to figure out the beginning and end of a substring is to note both ends of all the bulbs that go off when you remove one bulb from that substring. Once you know the beginning and end of the substring you want to remove, the next thing to do is trim the entire section at both ends.
When removing a section or substring from your lights, it is better to start with the section furthest away from the plug (the last section/substring). This makes the process much easier.
Step 4: Trim the Substring at Both Ends

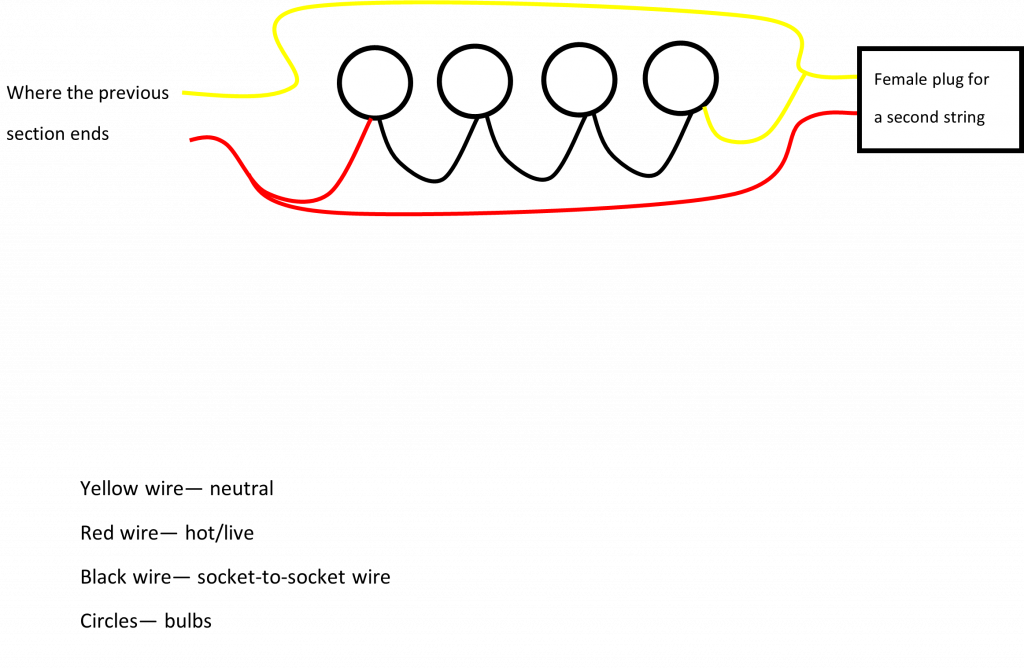
If you are removing the last substring/section, you only have to trim it at the point it connects to the rest of the string. But before you do any trimming, pay attention to the wiring of the Christmas lights.
As seen in the diagram above, you will notice that the section starts with two wires before spreading into 3 wires and tapering into two wires again.
To shorten your lights, cut the two wires coming from the previous section with wire cutters. In our diagram, those two wires are labeled “where the previous section ends.”
Step 5: Cover the Lose Ends
After cutting the last section/substring of your Christmas lights off, the remaining part of the string will have two exposed wires. You must cover those wires with wire nuts.
If you intend to use the lights outdoors, ensure the wire nuts are waterproof and weatherproof. To strengthen the seal of the wire connectors/nuts on the bare wires, you may cover them with electrical tape.
Step 6: Connect Your Christmas Lights
Once you have all the exposed wires covered, you may connect your Christmas lights.
How to Shorten String Christmas Lights With One Series Circuit
If all the bulbs in your Christmas light are in series, you can shorten them by removing a few bulbs. However, there’s a real chance that removing some bulbs from the series may cause the other bulbs to burn out.
Here’s why: when in series, all the bulbs receive an equal share of the total voltage. So, taking some bulbs out of the series will increase the share of the total voltage each bulb receives.
For example, if you plug a 50-bulb Christmas light into a 120v outlet, each bulb will get approximately 120 ÷ 50 volts (2.4 volts). But if you remove 5 bulbs, the total bulb count will become 45, and each bulb will get 120 ÷ 45 volts (2.67 volts).
Since the voltage getting to each bulb is now higher, the bulbs may burn, especially if the new voltage exceeds their rating.
If you still want to remove some bulbs from your Christmas lights to make them shorter, follow these steps:
Step 1: Disconnect the Lights From a Power Outlet
Disconnect the lights from the outlet and count how many bulbs you have to remove to get the length you need.
Step 2: Cutting the Bulb(s)

When shortening your lights by removing individual bulbs, end your count on the last bulb on the string (the bulb farthest from the plug). This makes things easier.
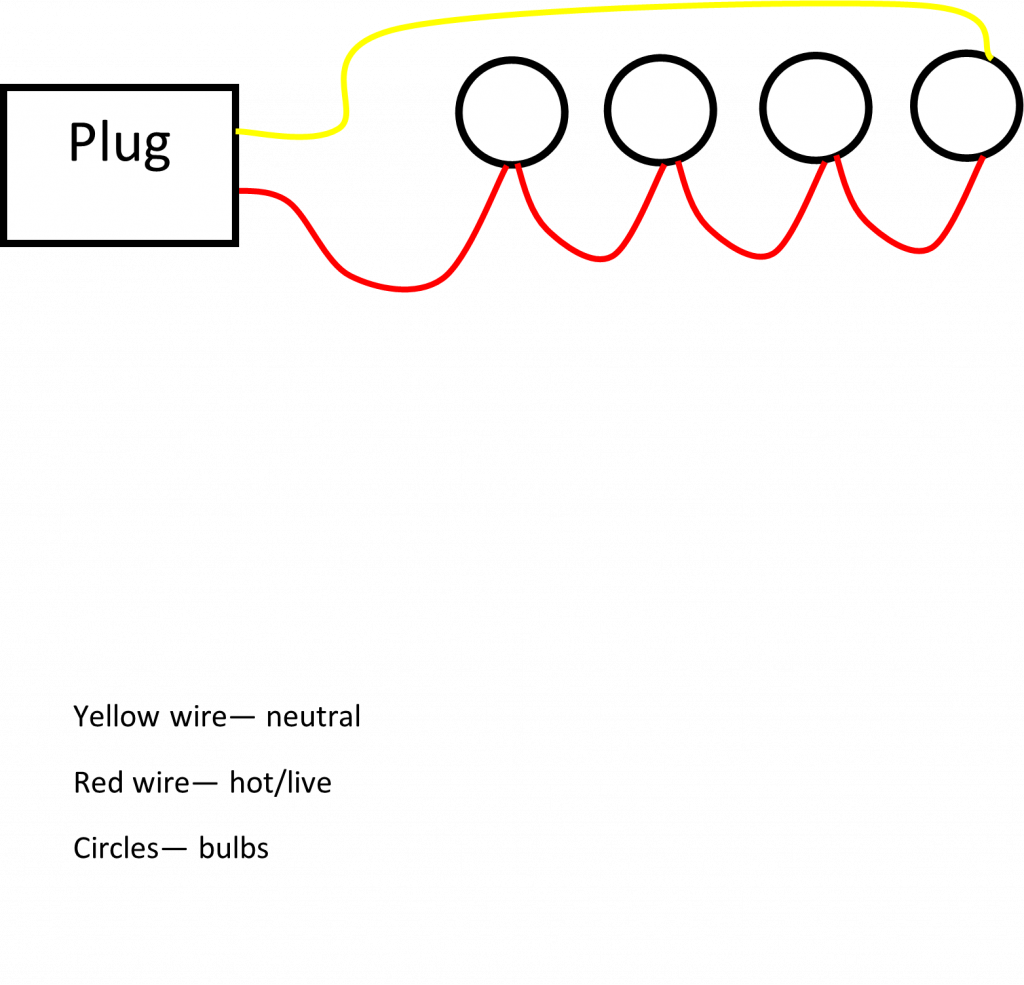
For example, if you intend to remove 3 bulbs, count the last bulb and 2 bulbs before it. Then cut the wires going into the socket of the first bulb amongst the 3 bulbs. Going by our diagram, this wire would be a red wire.
Then move to the last among the 3 bulbs and cut the wire going out of its socket. Going by our diagram, this would be the yellow wire.
Step 3: Connect the Two Unconnected Wires and Plug the Lights
After cutting the 3 bulbs out of the string, you will have two unconnected wires in the string.
- Strip a small portion of the end of those unconnected wires to expose some of the copper cable inside them.
- Next, twist the copper cables of both unconnected wires together to connect them.
- Then cover the bare copper at the point where the 2 wires meet with a wire nut connector. You may strengthen the seal with some electrical tape.
- Once all the bare ends are covered, you may plug in and test the lights.
Steps 1 to 3 also apply when removing bulbs from a section/substring in lights with multiple series circuits.
How to Shorten String Christmas Lights With Parallel Circuit
You can shorten parallel circuit lights bulb by bulb without worrying about burning the remaining lights. Unlike series circuits, every bulb in these types of circuits always receives the same voltage, no matter the number of bulbs.
In other words, if you have 50 bulbs connected to a 120v power outlet, each bulb will receive 120v. If you reduce the number of bulbs to 40, each bulb will still get 120v.
Step 1: Disconnect the Lights From a Power Outlet
Disconnect the lights from the outlet and count how many bulbs you have to remove to get the length you need.
Step 2: Cutting the Bulb(s)

When cutting bulbs out, end your count on the last bulb on the string (the bulb farthest from the plug). This makes things easier.
For example, if you intend to remove 3 bulbs, count the last bulb and 2 bulbs before it. Then cut the 2 wires (red and yellow) going into the socket of the first bulb amongst the 3 bulbs.
Step 3: Cover the Bare Wires
After cutting out the bulbs, you will have 2 bare wires. Cover each one with a wire nut connector. Then plug your Christmas lights.


